This section describes tabs that are common to many modules, including:
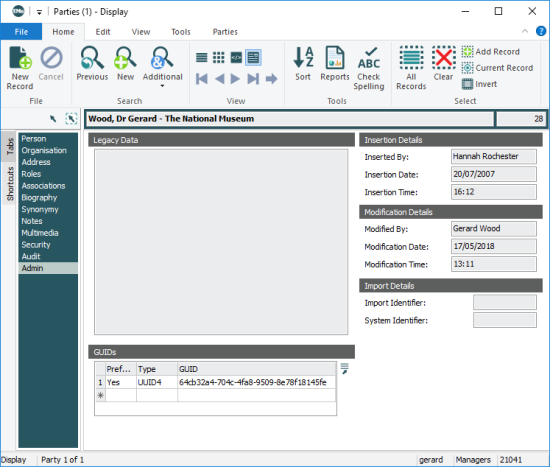
All modules include an Admin tab:
|
Field Group |
Field |
Description |
|---|---|---|
|
Legacy Data |
The original data imported into this |
|
|
Insertion Details |
||
|
Inserted By |
Name of user responsible for the insertion of the record. |
|
|
Insertion Date |
Date of record insertion. |
|
|
Insertion Time |
Time of record insertion. |
|
|
Modification Details |
||
|
Modified By |
Name of user responsible for the most recent modification of the record. |
|
|
Modification Date |
Date of most recent record modification. |
|
|
Modification Time |
Time of most recent record modification. |
|
|
Import Details |
||
|
Import Identifier |
An optional code users can enter when importing records with the Import Tool. |
|
|
System Identifier |
Unique code auto-generated by the System when records are imported using the Import Tool. A System identifier is not added to an existing record that is updated during the import: when the Import Wizard is used, new records get a System identifier, existing records do not. The identifier is constructed from the username, and the date and time (24 hour clock) the import commenced. The format of the System identifier is username-yymmdd-hhmm. The System Identifier can be used to locate all records imported in a particular batch. |
|
|
GUIDs |
|
See GUID Support for details. |
| Preferred |
Yes / No. Only one GUID in the GUIDs table can be marked as preferred. |
|
| Type | Lookup List of GUID types. | |
| GUID | The GUID itself. |
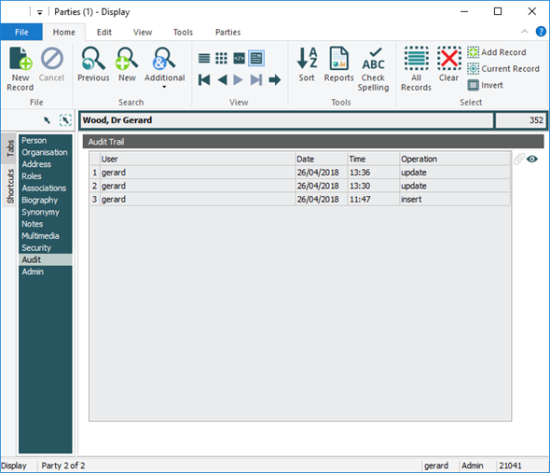
Every module in
The content of the Audit tab is generated each time the tab is viewed. Each row in the Audit Trail table is a summary of a record held in the Audit Trails module. To view full audit trail record(s):
- Select one or more rows in the Audit Trail table.
- Click the View Attachment
 button beside the table.
The Audit Trails module will open and display the selected record(s).
Tip: To view all records listed in the Audit Trail table, click  without selecting a row in the table.
Many modules include the Multimedia tab.
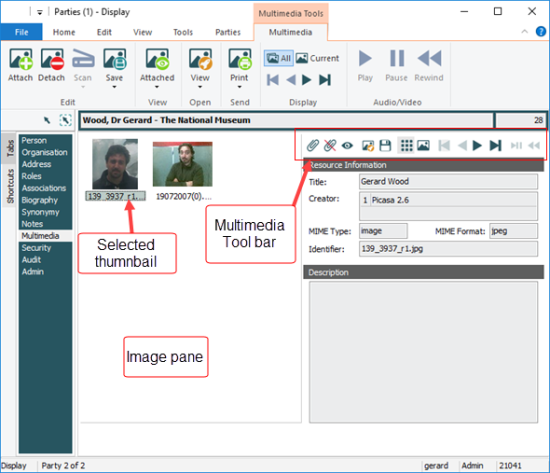
Multimedia resources added to the Multimedia module can be attached to a record in another module. Attached multimedia resources display on the Multimedia tab for that record:
Tip: It is possible to add multimedia to
See:
A Multimedia tab is added to a module's Ribbon when the Multimedia tab (listed in a module's Tabs pane) is selected in Display mode (as shown above):
|
Group |
Command |
2nd level |
Description |
|---|---|---|---|
|
Edit |
|
Attach a multimedia resource to the current record. |
|
|
|
Detach the multimedia resource from the current record. |
||
| Scan
|
Scan an image. |
||
|
Set up a scanner. |
|||
|
|
Download the multimedia resource and save it. The drop list can include one or more resolutions and file formats to choose from. |
||
|
View |
Current |
View the currently selected multimedia resource attached to a record in the Multimedia module. |
|
|
|
All |
View all multimedia resources attached to a record in the Multimedia module. |
|
|
Open |
|
Launch an application (on your PC) to view the multimedia resource. |
|
|
Send |
|
Print the multimedia resource in specific format and size, e.g. Certified (Large). |
|
|
Display |
|
View the multimedia resources attached to a record as thumbnails. |
|
|
|
View the multimedia resource attached to a record in a larger view. |
||
|
|
Where more than one multimedia resource is added to the record, move to the first multimedia resource. |
||
|
|
Where more than one multimedia resource is added to the record, move to the previous multimedia resource. |
||
|
|
Where more than one multimedia resource is added to the record, move to the next multimedia resource. |
||
|
|
Where more than one multimedia resource is added to the record, move to the last multimedia resource. |
||
|
Audio/Video |
|
Play the video or audio file. |
|
|
Pause the video or audio file. |
|||
|
Stop the video or audio file. |
|||
|
Rewind the video or audio file. |
A Multimedia Tool bar also displays on the Multimedia tab:
|
Button |
Name |
Description |
|---|---|---|

|
Attach multimedia |
Add media to the current record. |

|
Detach multimedia | Select a thumbnail in the Image pane and remove that media from the current record. |
|
|
View attached multimedia |
Select a thumbnail in the Image pane and view the Multimedia record for the media. |

|
Launch viewer | Select a thumbnail in the Image pane and launch an associated application to view the media. |

|
Save multimedia (download) | Download media. |
|
|
View all multimedia |
If there is more than one resource attached to the current record, view thumbnails of the attached resources in the Image pane. |
|
|
View current multimedia |
If there is more than one resource attached to the current record, view the resource selected in the Image pane. |
|
|
Navigate multimedia |
Cycle through any attached media resources (First, Previous, Next, Last). |
|
|
Play media |
Play / Pause / Rewind the selected audio / video. |
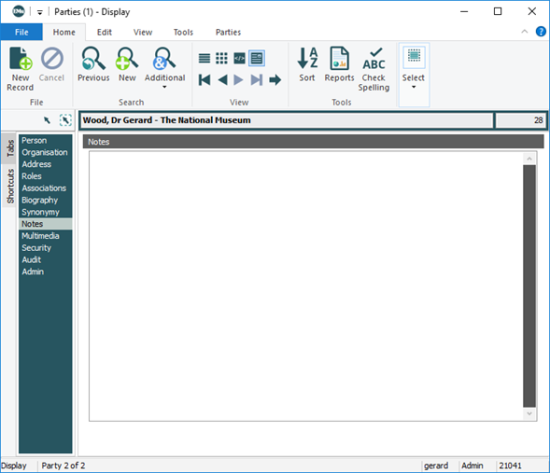
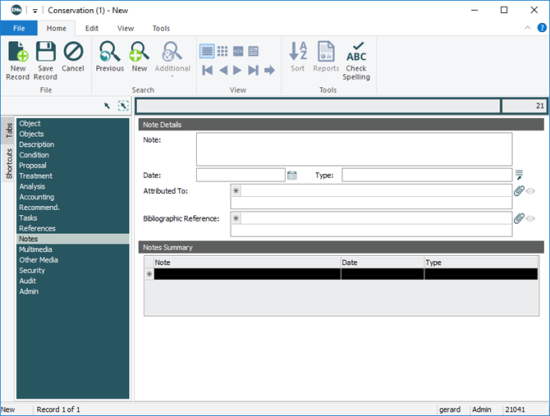
One of two versions of the Notes tab will be enabled in your version of
Each row in the Notes Summary table records a separate note, that includes:
- The note itself (entered in the Note: (Note Details) field)
- A date (entered in the Date: (Note Details) field)
- To whom the note is attributed (a link to a record in the Parties module)
- Any additional bibliographic references (a link to a record in the Bibliography module
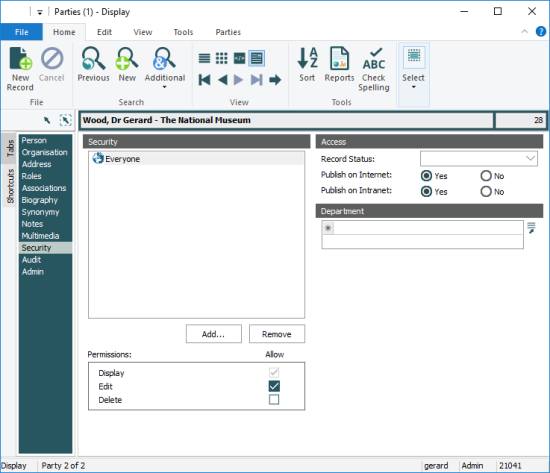
All modules except for Field Level Help include the Security tab:
With Record Level Security it is possible to set permissions for who can view (Display), Edit and Delete records on a per user and per group basis.
Additional criteria can be specified in the Registry to refine these three standard security privileges. For instance, it is possible to specify that:
- Records that have been Retired, cannot be viewed by a certain group of users.
- Only members of a department can edit and delete that department's records.
It is also possible to search for records based on the Record Level Security permissions assigned to users and groups. If a user or group has been removed from
Details about setting Record Level Security are available in Record Level Security.
Details for System Administrators about Registry settings for Record Level Security are available in
|
Security Tab |
Description | |||||||||
|---|---|---|---|---|---|---|---|---|---|---|
|
Security |
|
Add / Remove users / groups in order to give / deny them Permissions for this record. |
||||||||
|
Permissions |
|
Specify whether a user / group has Display, Edit or Delete Permissions to this record.
|
||||||||
|
Department |
|
Select a Department to further fine-tune access permissions. See How to refine Record Level Security by specifying conditional criteria for details. |
||||||||
|
Access |
These values are not entered automatically by |
|||||||||
|
|
Record Status |
Status of the record. The default value is blank, which indicates an active record. A common alternative is Retired. |
||||||||
|
|
Publish on Internet |
Indication if the integrity and security of the data are sufficient for it to be published on the Internet. Options are:
|
||||||||
|
|
Publish on Intranet |
Indication if the integrity and security of the data are sufficient for it to be published on the Intranet. Options are:
|
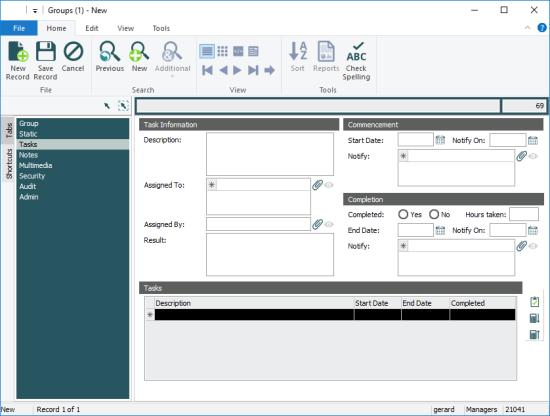
The Tasks tab records details about one or more tasks assigned for the current record:
How to add a task to a record
To add one or more tasks to a record:
- Locate the record requiring a task.
- Select the Tasks tab.
- In the Description: (Task Information) field enter a description of the first task.
- In the Assigned To: (Task Information) field attach the Parties record of the person assigned the task.
- In the Assigned By: (Task Information) field attach the Parties record of the person who assigned the task.
- In the Date: (Commencement) field enter the date the task is to start.
- In the Notify On: (Commencement) field enter a notification date (if required). The person selected at Step 8 will be notified by email on this date that the task is due to commence.
- In the Notify: (Commencement) field attach the Parties record of a person to be notified of the commencement of the task.
- Repeat Step 8 for all people to be notified.
To add another person, select the asterisk (*) in the Notify: (Commencement) list before clicking Attach
 .
. - In the Completion group of fields it is possible to enter a projected completion date, a notification date and to attach the Parties records of those who are to be notified that the task is due to be completed.
Note: These fields can also be used to record the actual completion date; to flag that the task has been completed select the Yes radio button in the Completed: (Completion) field).
- To add another task, click the asterisk (*) in the next line in the Tasks list; the fields on the tab are cleared, ready for the new task details.
- Save the record.
Note: If the tasks are to be repeated regularly, a Task Template can be created and used to save time and effort.
